
Shopify Integration
Wylto’s Shopify integration lets you send automatic, personalized WhatsApp messages at every stage of a customer’s order — abandoned cart, order placed, payment confirmed, shipped, out for delivery, delivered, and cancelled. You build each automation as a Workflow: a Shopify event triggers it, and Wylto sends the WhatsApp message with dynamic variables, buttons, delays, and conditions. No coding required.
Prerequisites
Section titled “Prerequisites”Before you begin, make sure you have:
- An active Wylto account with a connected WhatsApp Business number.
- The Wylto app installed on your Shopify store and connected to your Wylto workspace.
- Approved WhatsApp templates (Utility/Marketing) for the messages you want to send.
Step 1 — Connect your Shopify store to Wylto
Section titled “Step 1 — Connect your Shopify store to Wylto”This one-time setup links your Shopify store to Wylto so your order events flow in automatically. It takes about 5 minutes: install the Wylto app, paste your App Token, and confirm the connection.
1a. Open the Shopify App Store and install Wylto
Section titled “1a. Open the Shopify App Store and install Wylto”There are two ways to reach the Wylto app — both land on the same listing. Most new customers use Option 1.
Option 1 — from the Shopify App Store (recommended):
- In your Shopify admin, go to Apps and search for Wylto (or open apps.shopify.com and search there).
- In the results, open the Wylto app — the one priced $1/year, described “Automate order confirmations and shipping via WhatsApp.” Don’t confuse it with the similarly named “Wyllo” app, which is a different product.
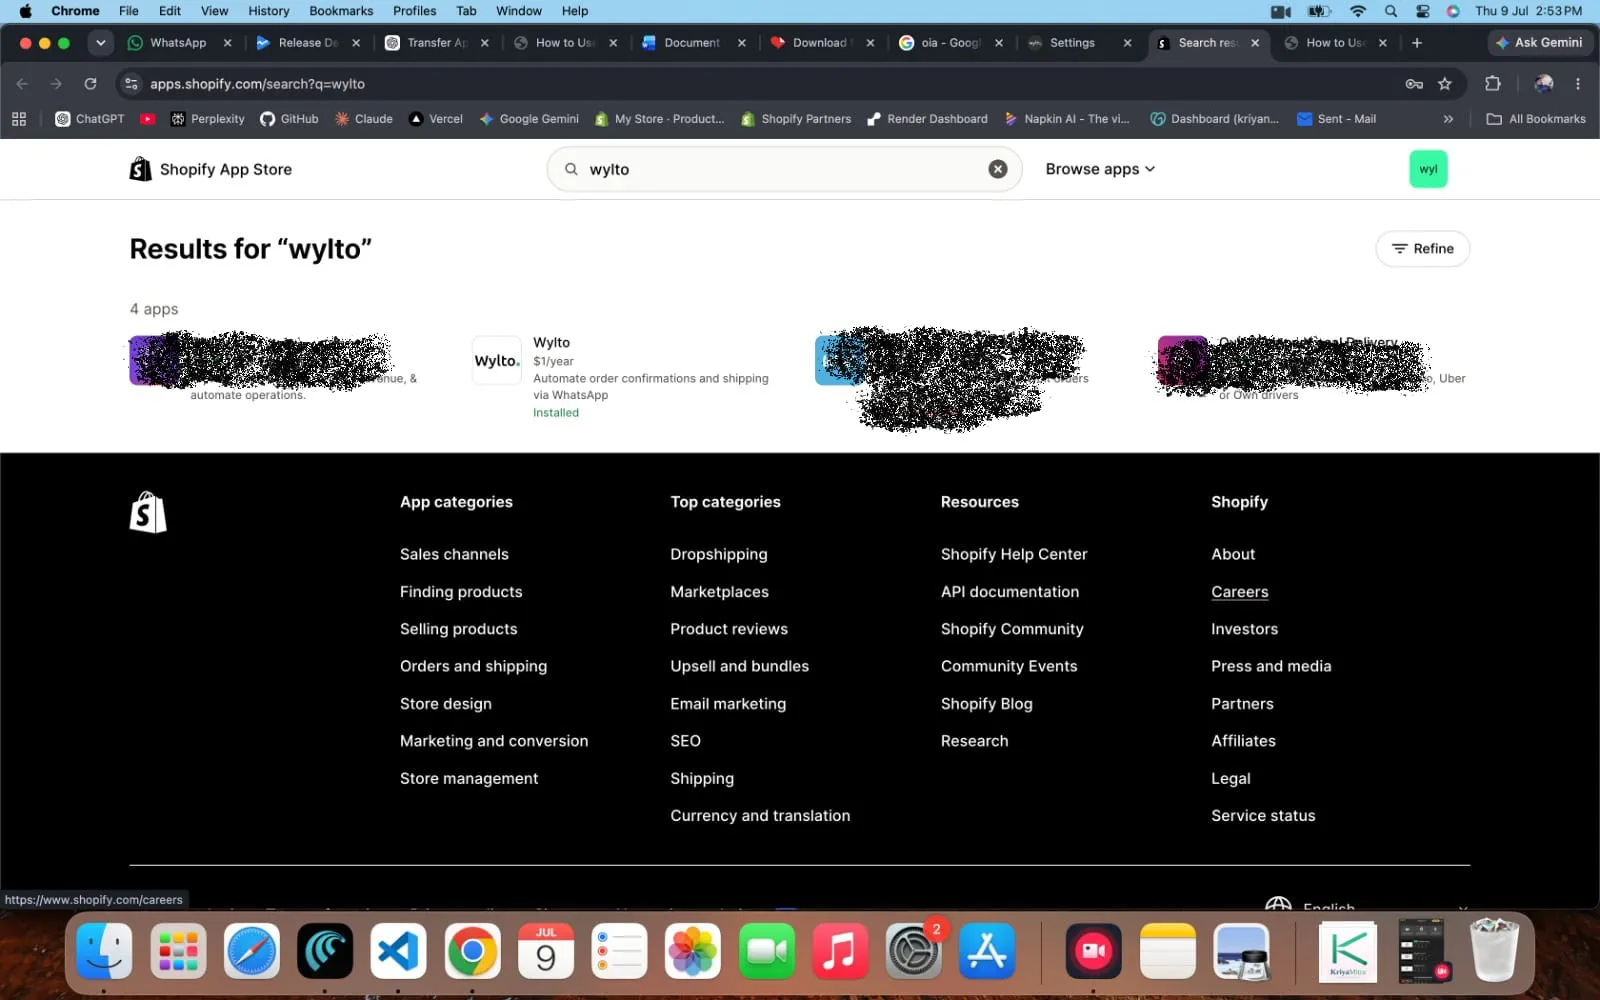
Option 2 — from Wylto (if you already have a Wylto account): in your Wylto Dashboard, go to Settings → Integrations → Shopify to open the Connect Shopify Store guide, then click Open Shopify App Store (step 1 of the guide) to jump straight to the same listing.
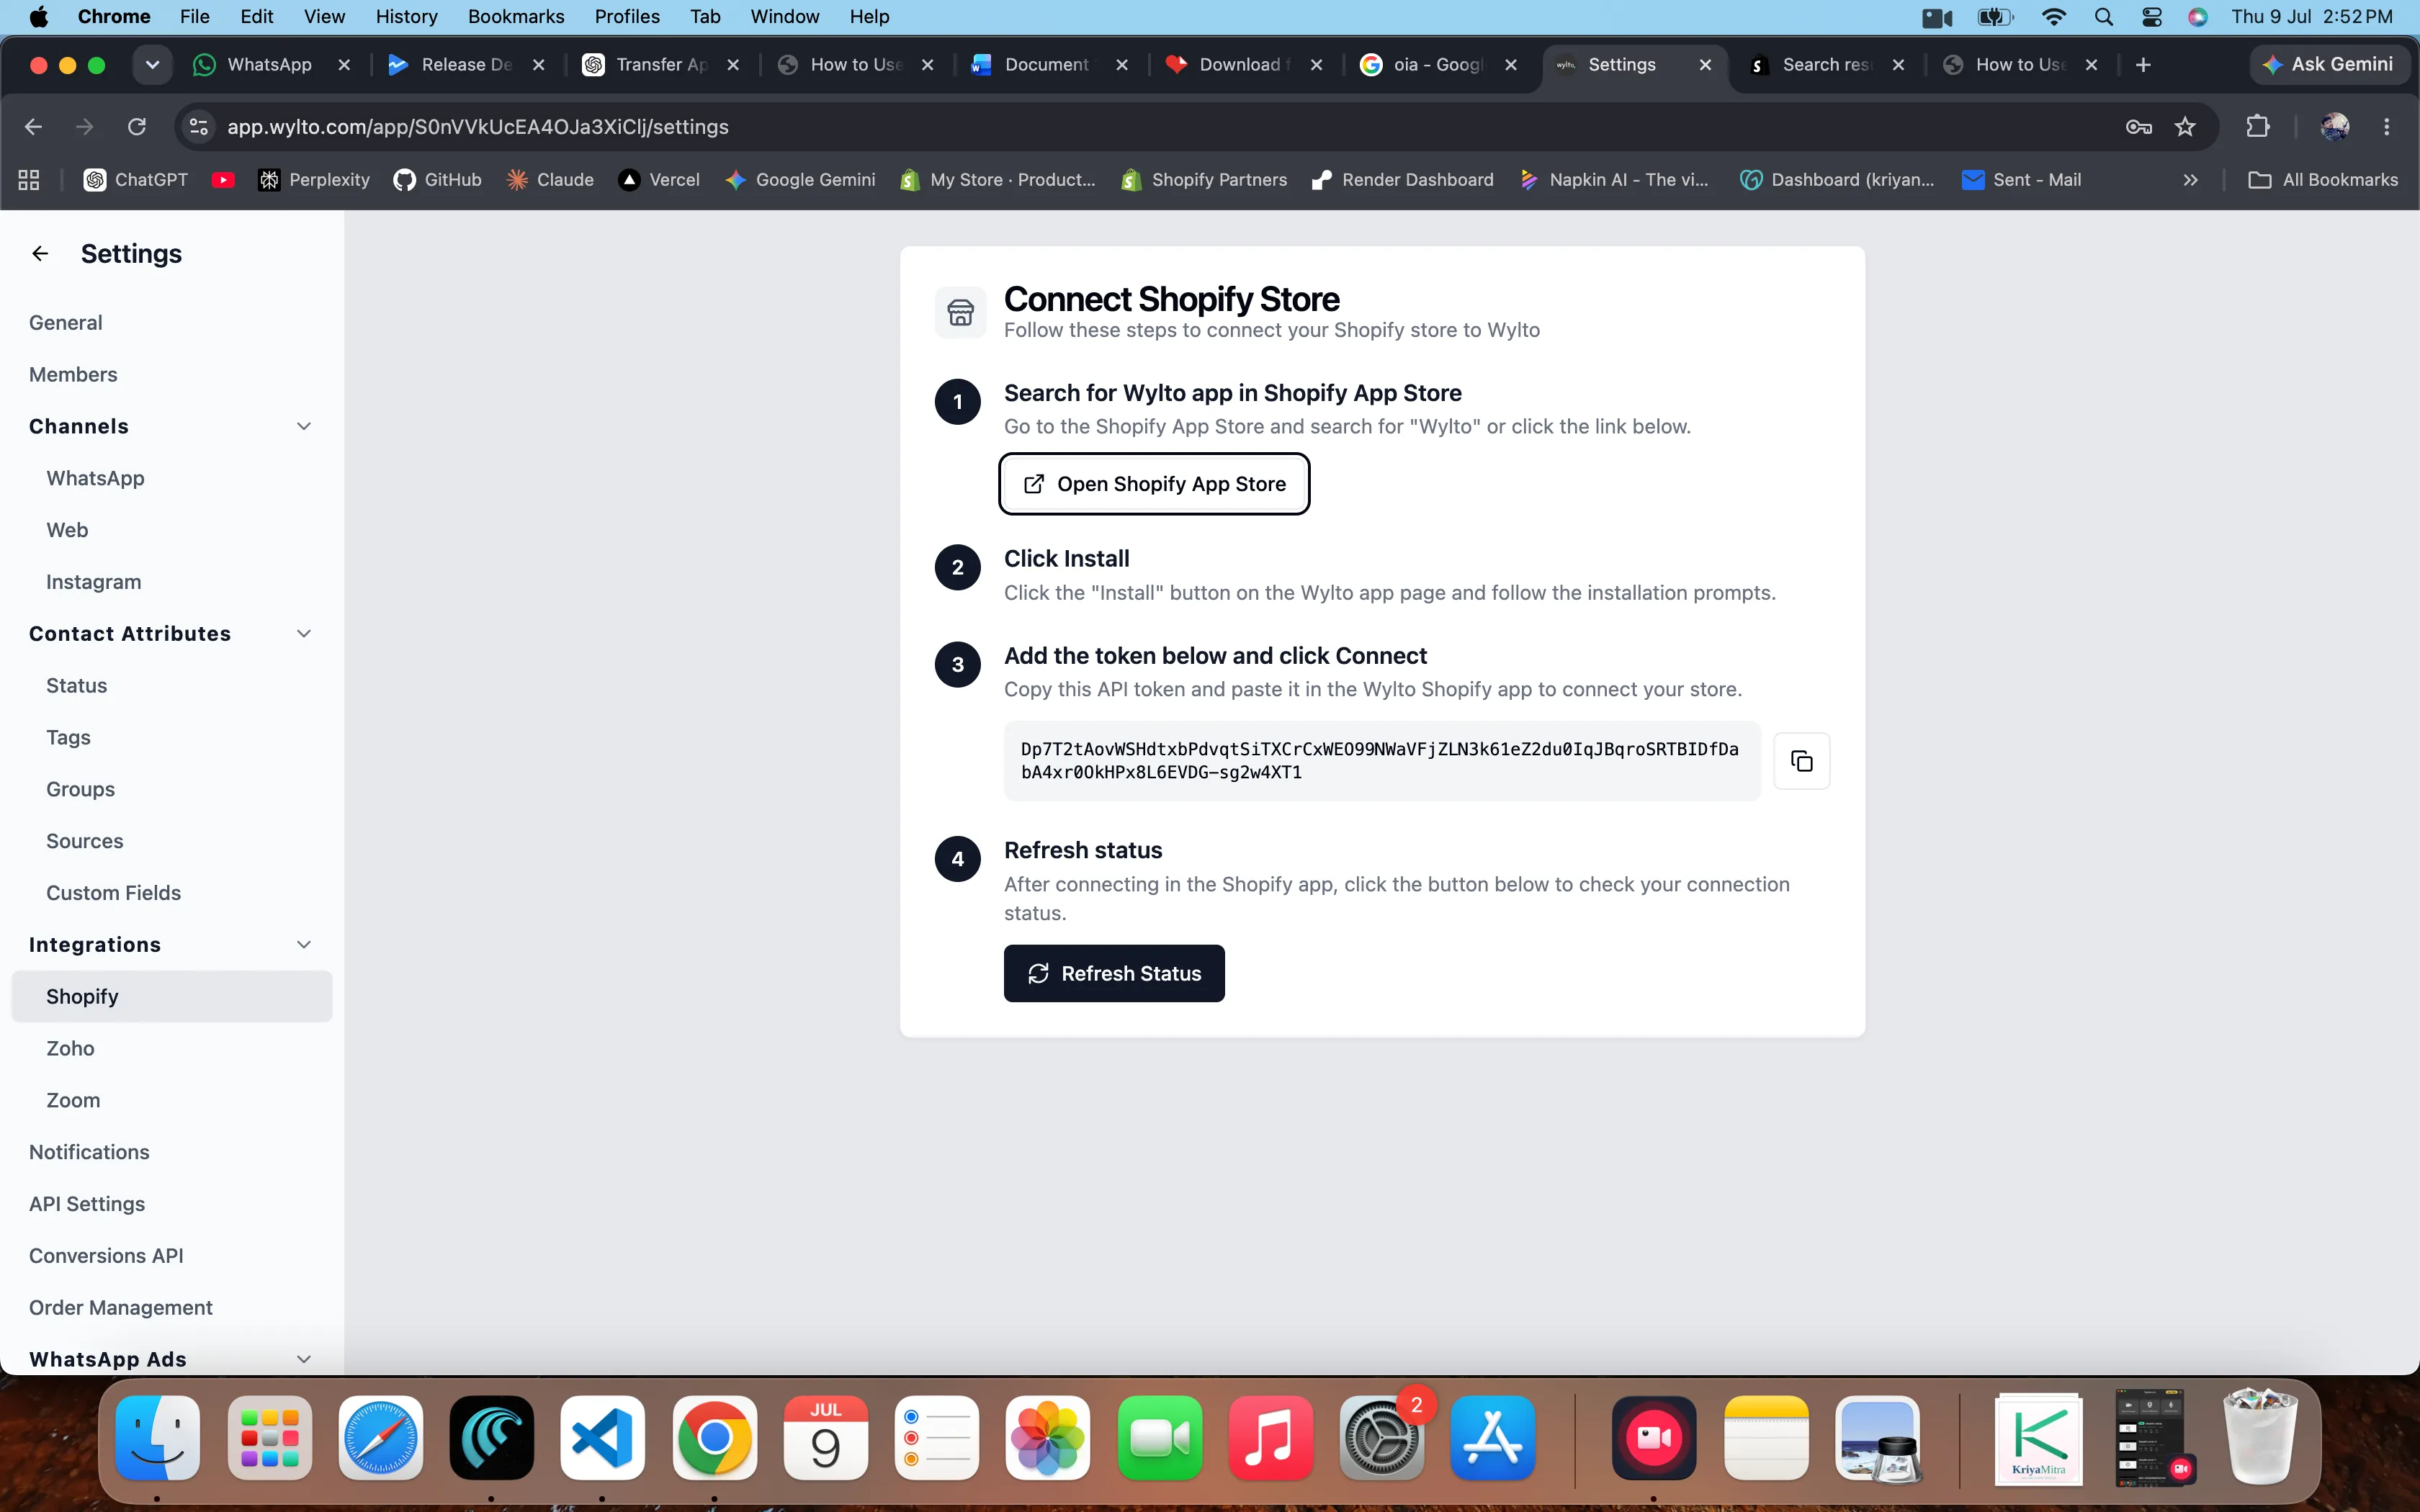
Whichever route you took, finish the install:
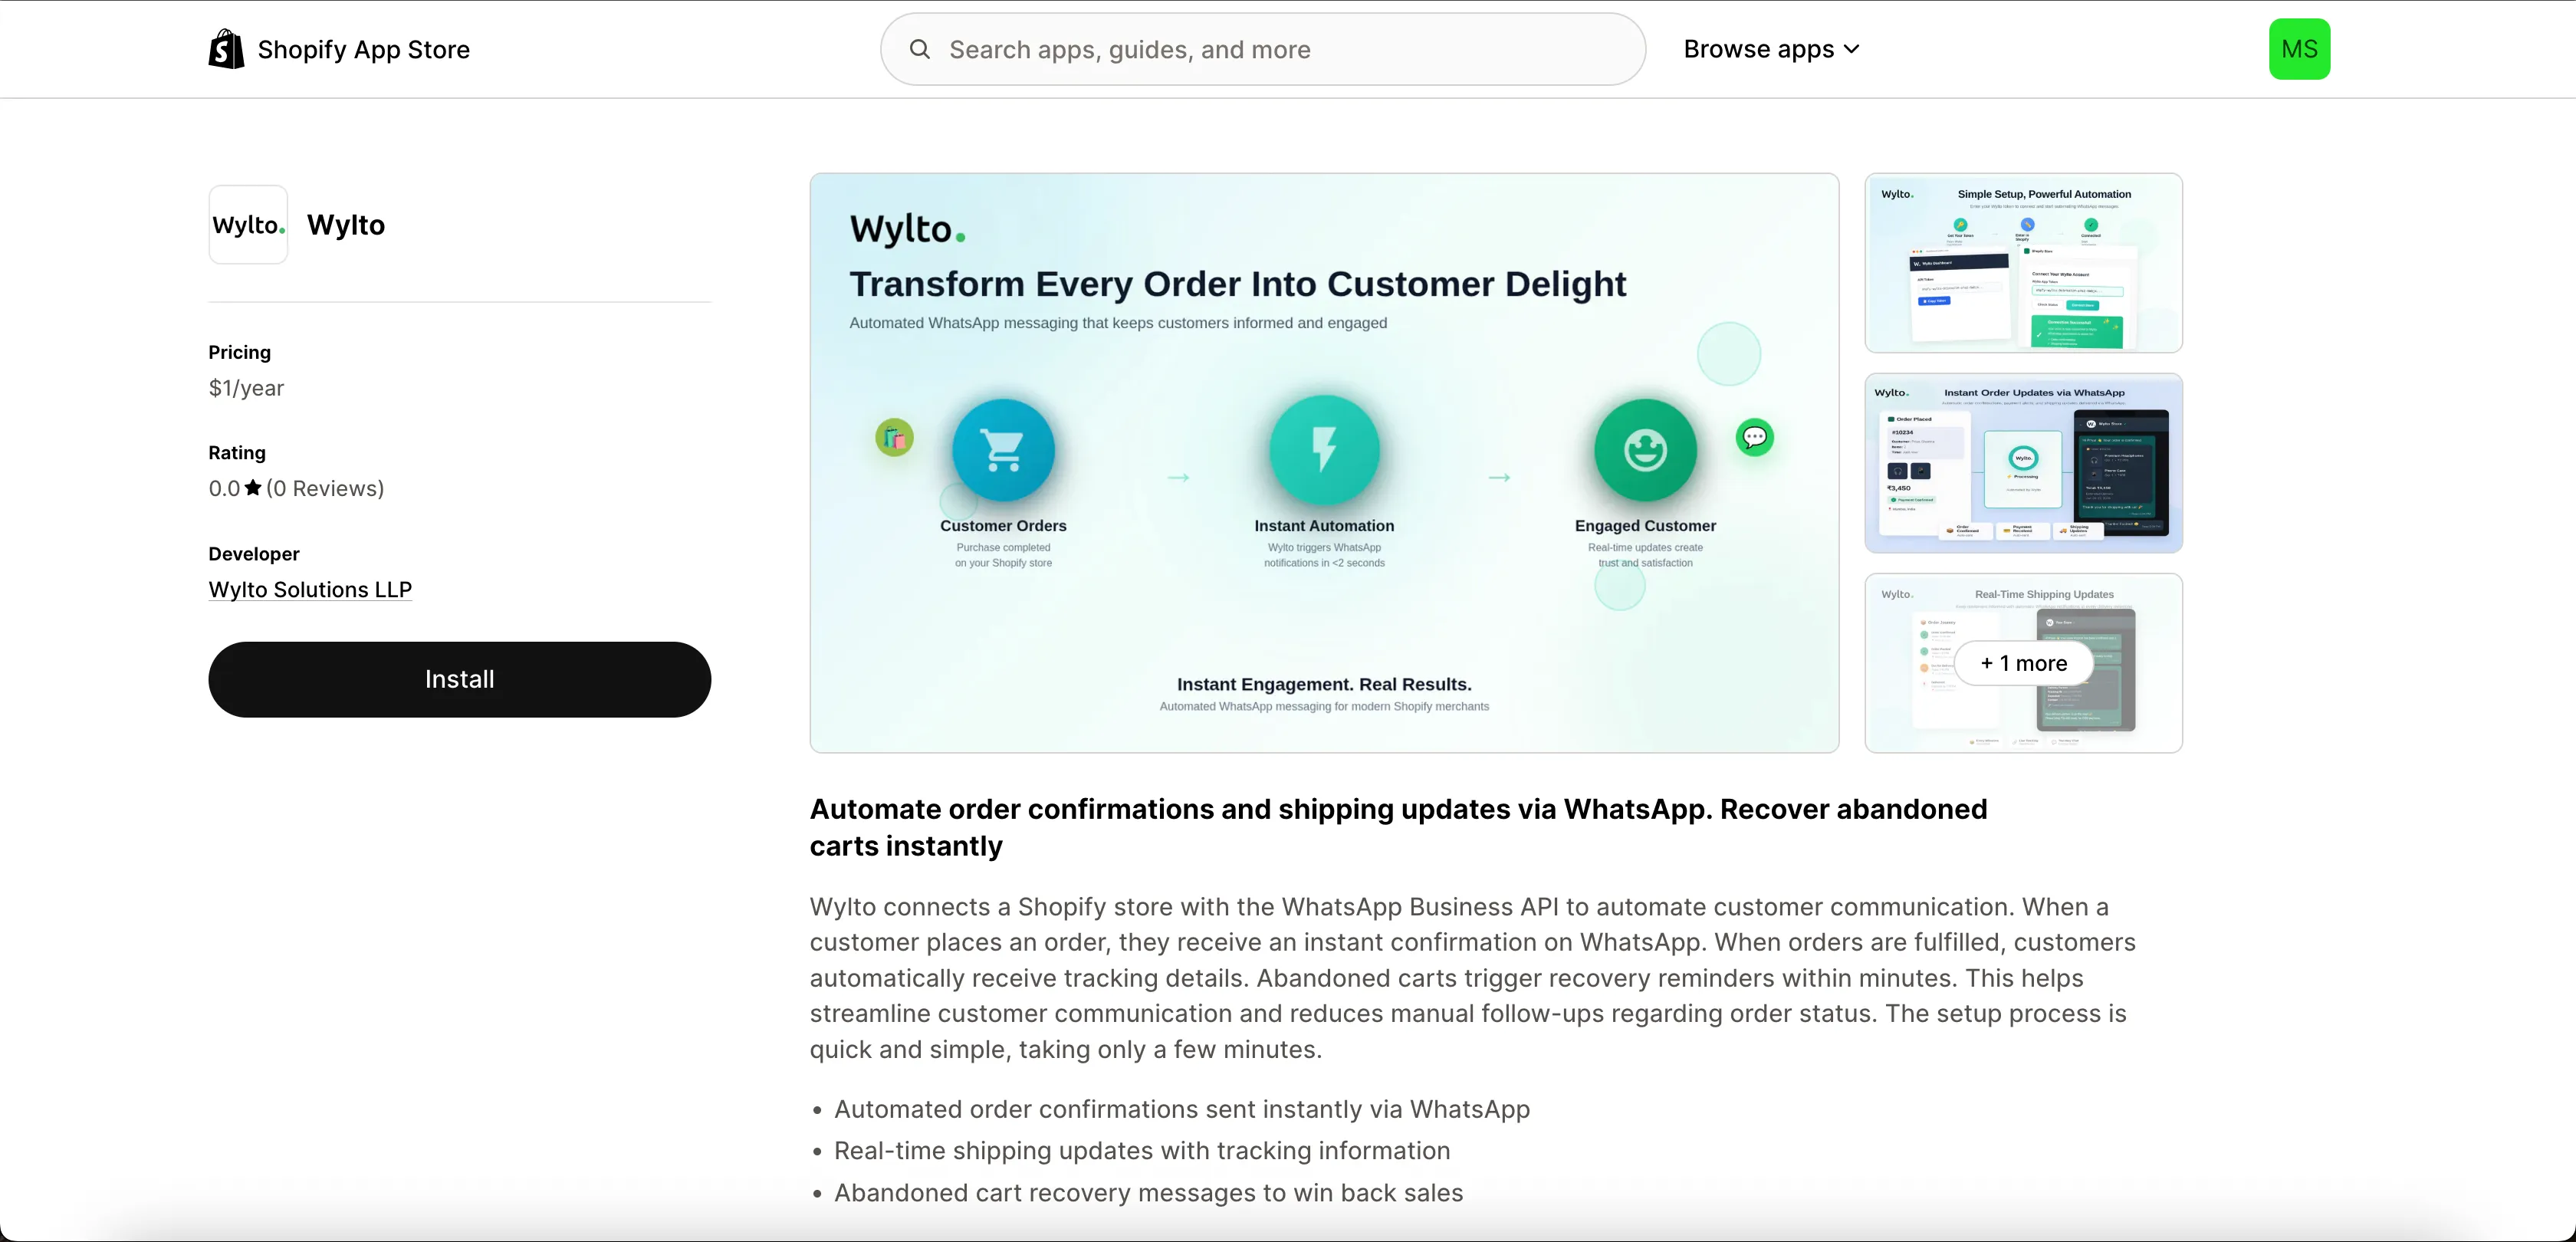
- On the Wylto listing, click Install and follow the prompts in your Shopify admin. Wylto asks only for read-only access to orders, fulfillments, checkouts, customers, and products, and never changes your store data.
- After installing, the app appears in your Shopify admin under Apps → Wylto.
1b. Copy your Wylto App Token
Section titled “1b. Copy your Wylto App Token”The App Token is the secret key that authenticates your store with Wylto. You copy it once and paste it into the Shopify app.
- Open your Wylto Dashboard (app.wylto.com) in a separate browser tab.
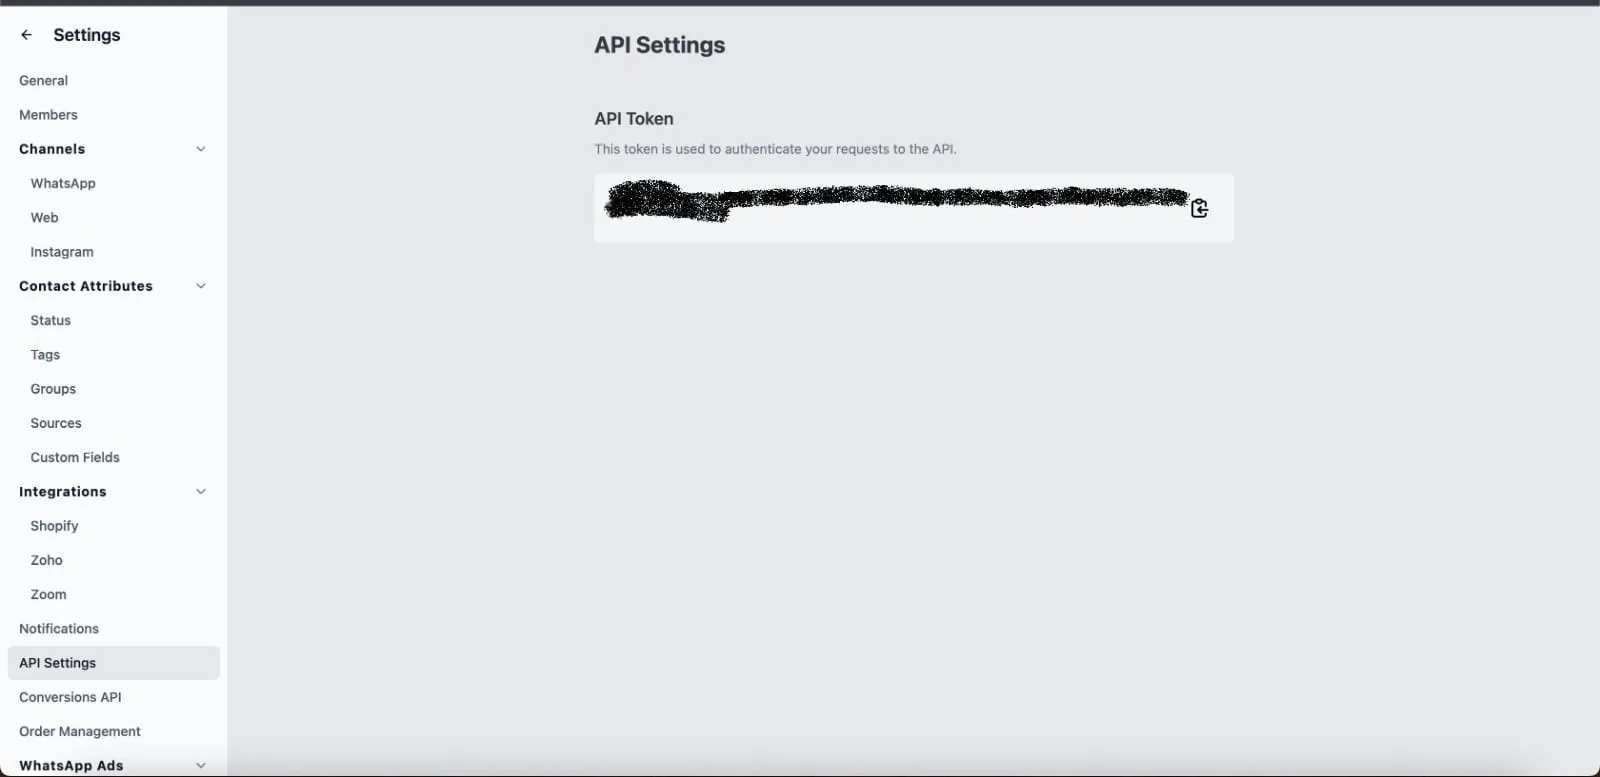
- Go to Settings → Integrations → Shopify to open the Connect Shopify Store guide. (You can also find the same token under Settings → API Settings.)
- Click Show API Token, then copy the full token to your clipboard.
1c. Paste the token into the Wylto app in Shopify
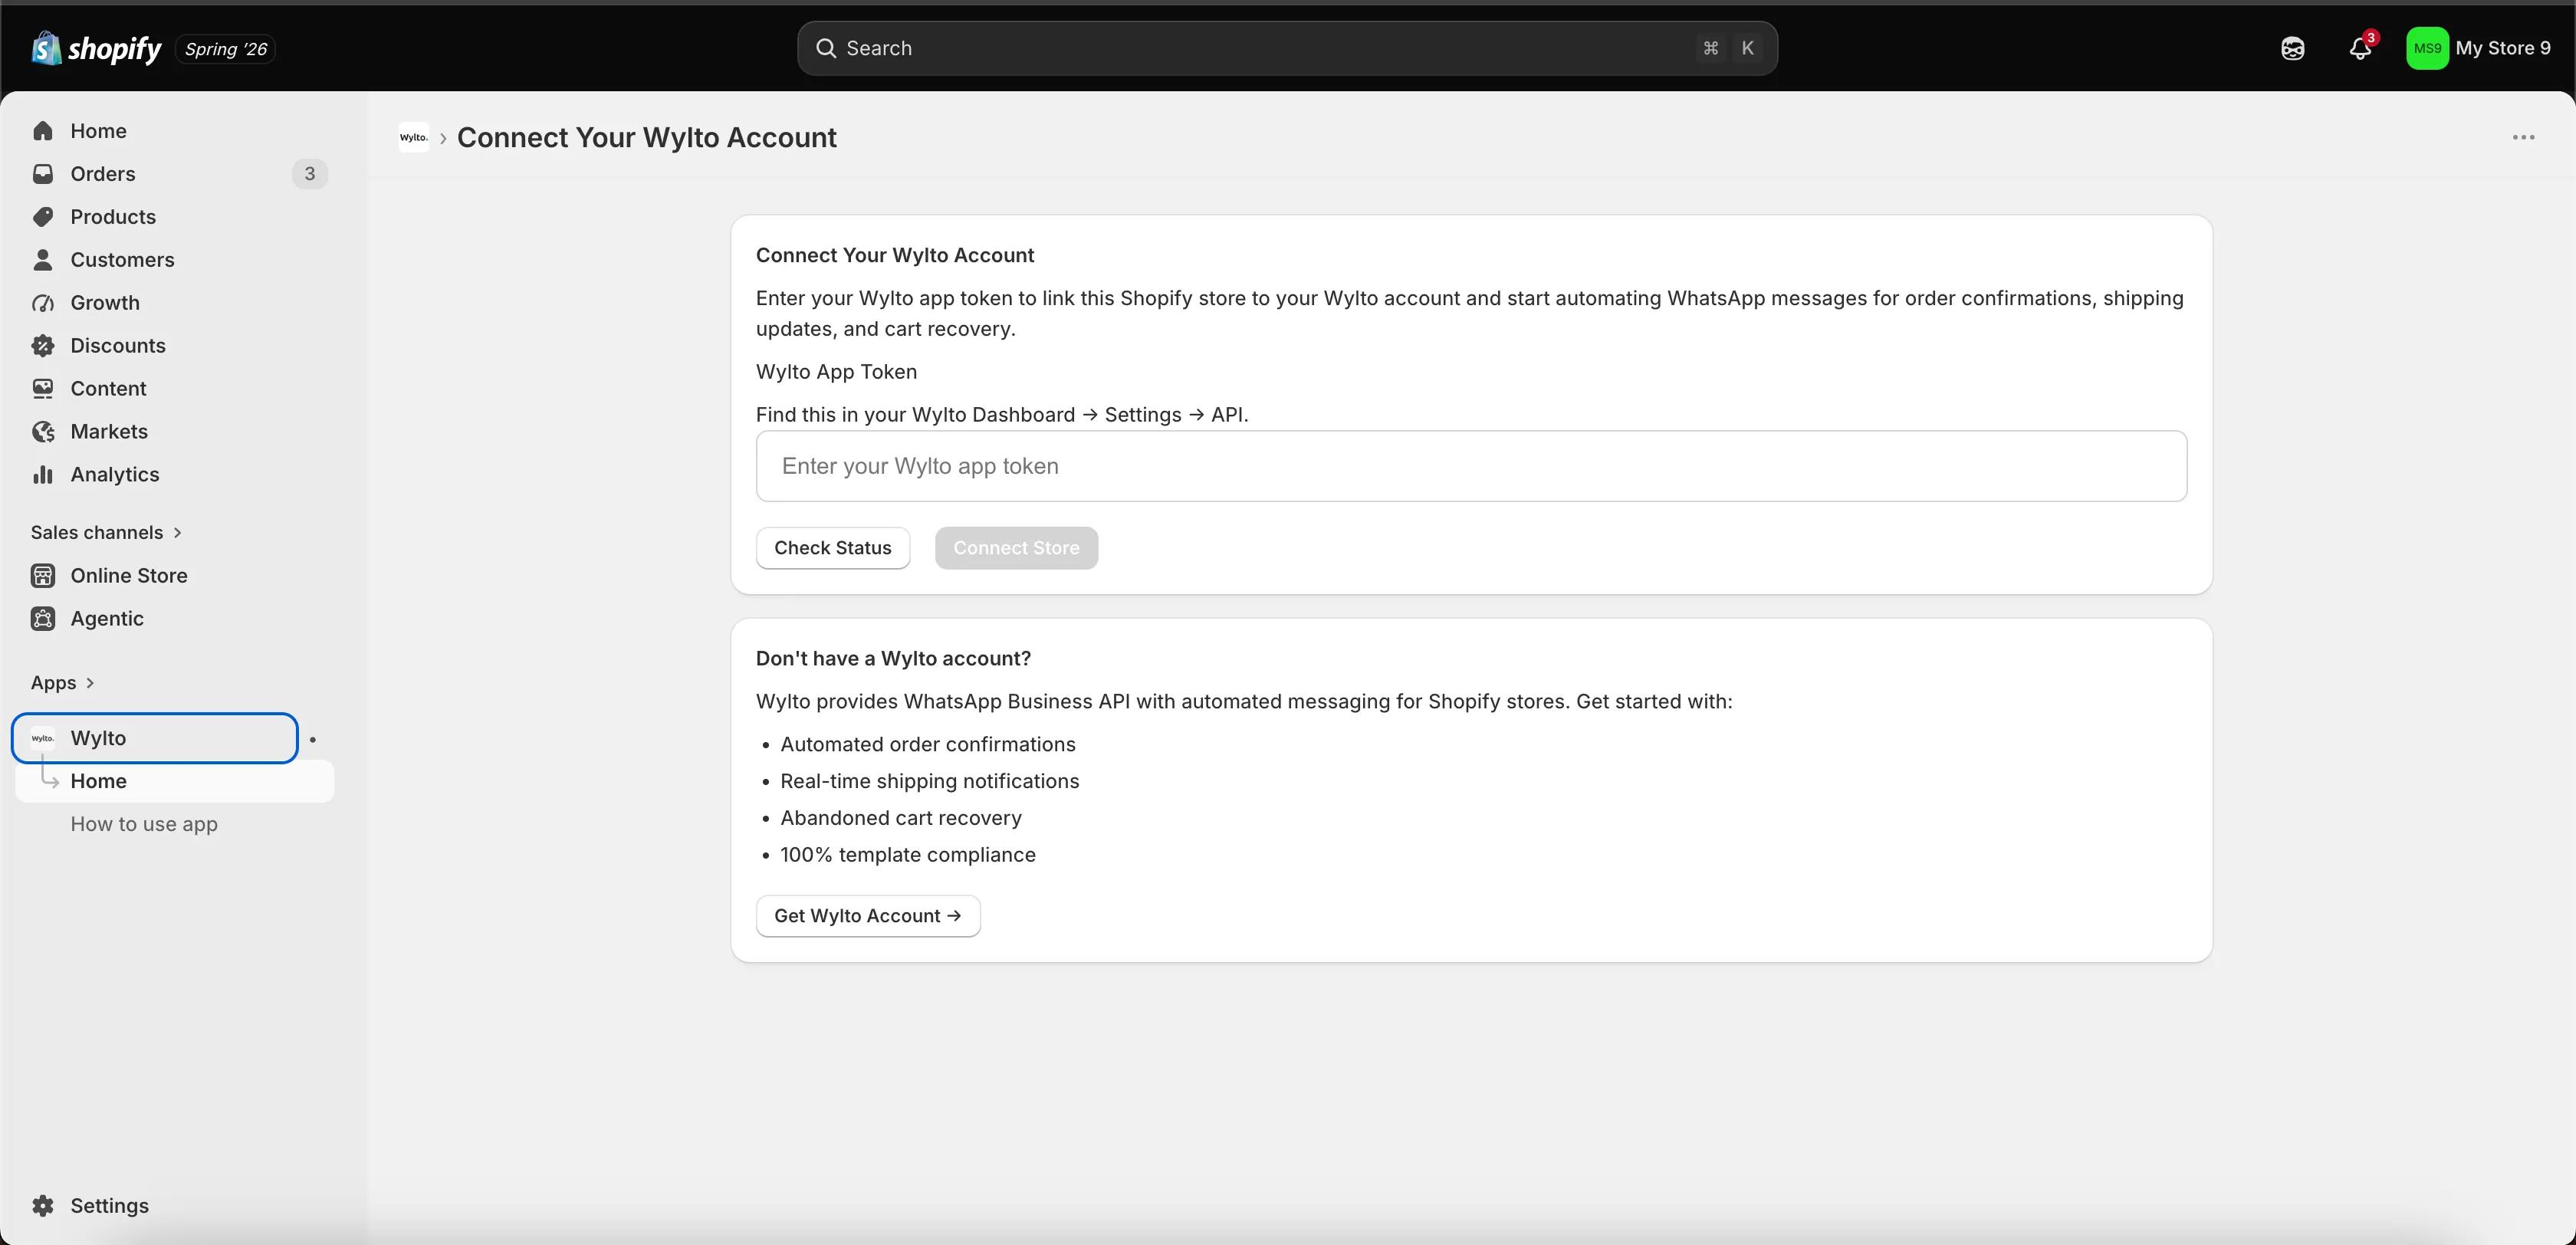
Section titled “1c. Paste the token into the Wylto app in Shopify”- Back in your Shopify admin, open Apps → Wylto → Home.
- On the Connect Your Wylto Account screen, paste the token into the Wylto App Token field.
- Click Connect Store.
1d. Confirm the connection
Section titled “1d. Confirm the connection”- Return to the Wylto guide and click Refresh Status.
- Confirm it shows Connected. Wylto now receives your store’s order events automatically — you’re ready to build automations.
Step 2 — Create the workflow and add the Shopify trigger
Section titled “Step 2 — Create the workflow and add the Shopify trigger”2a. Create a new workflow
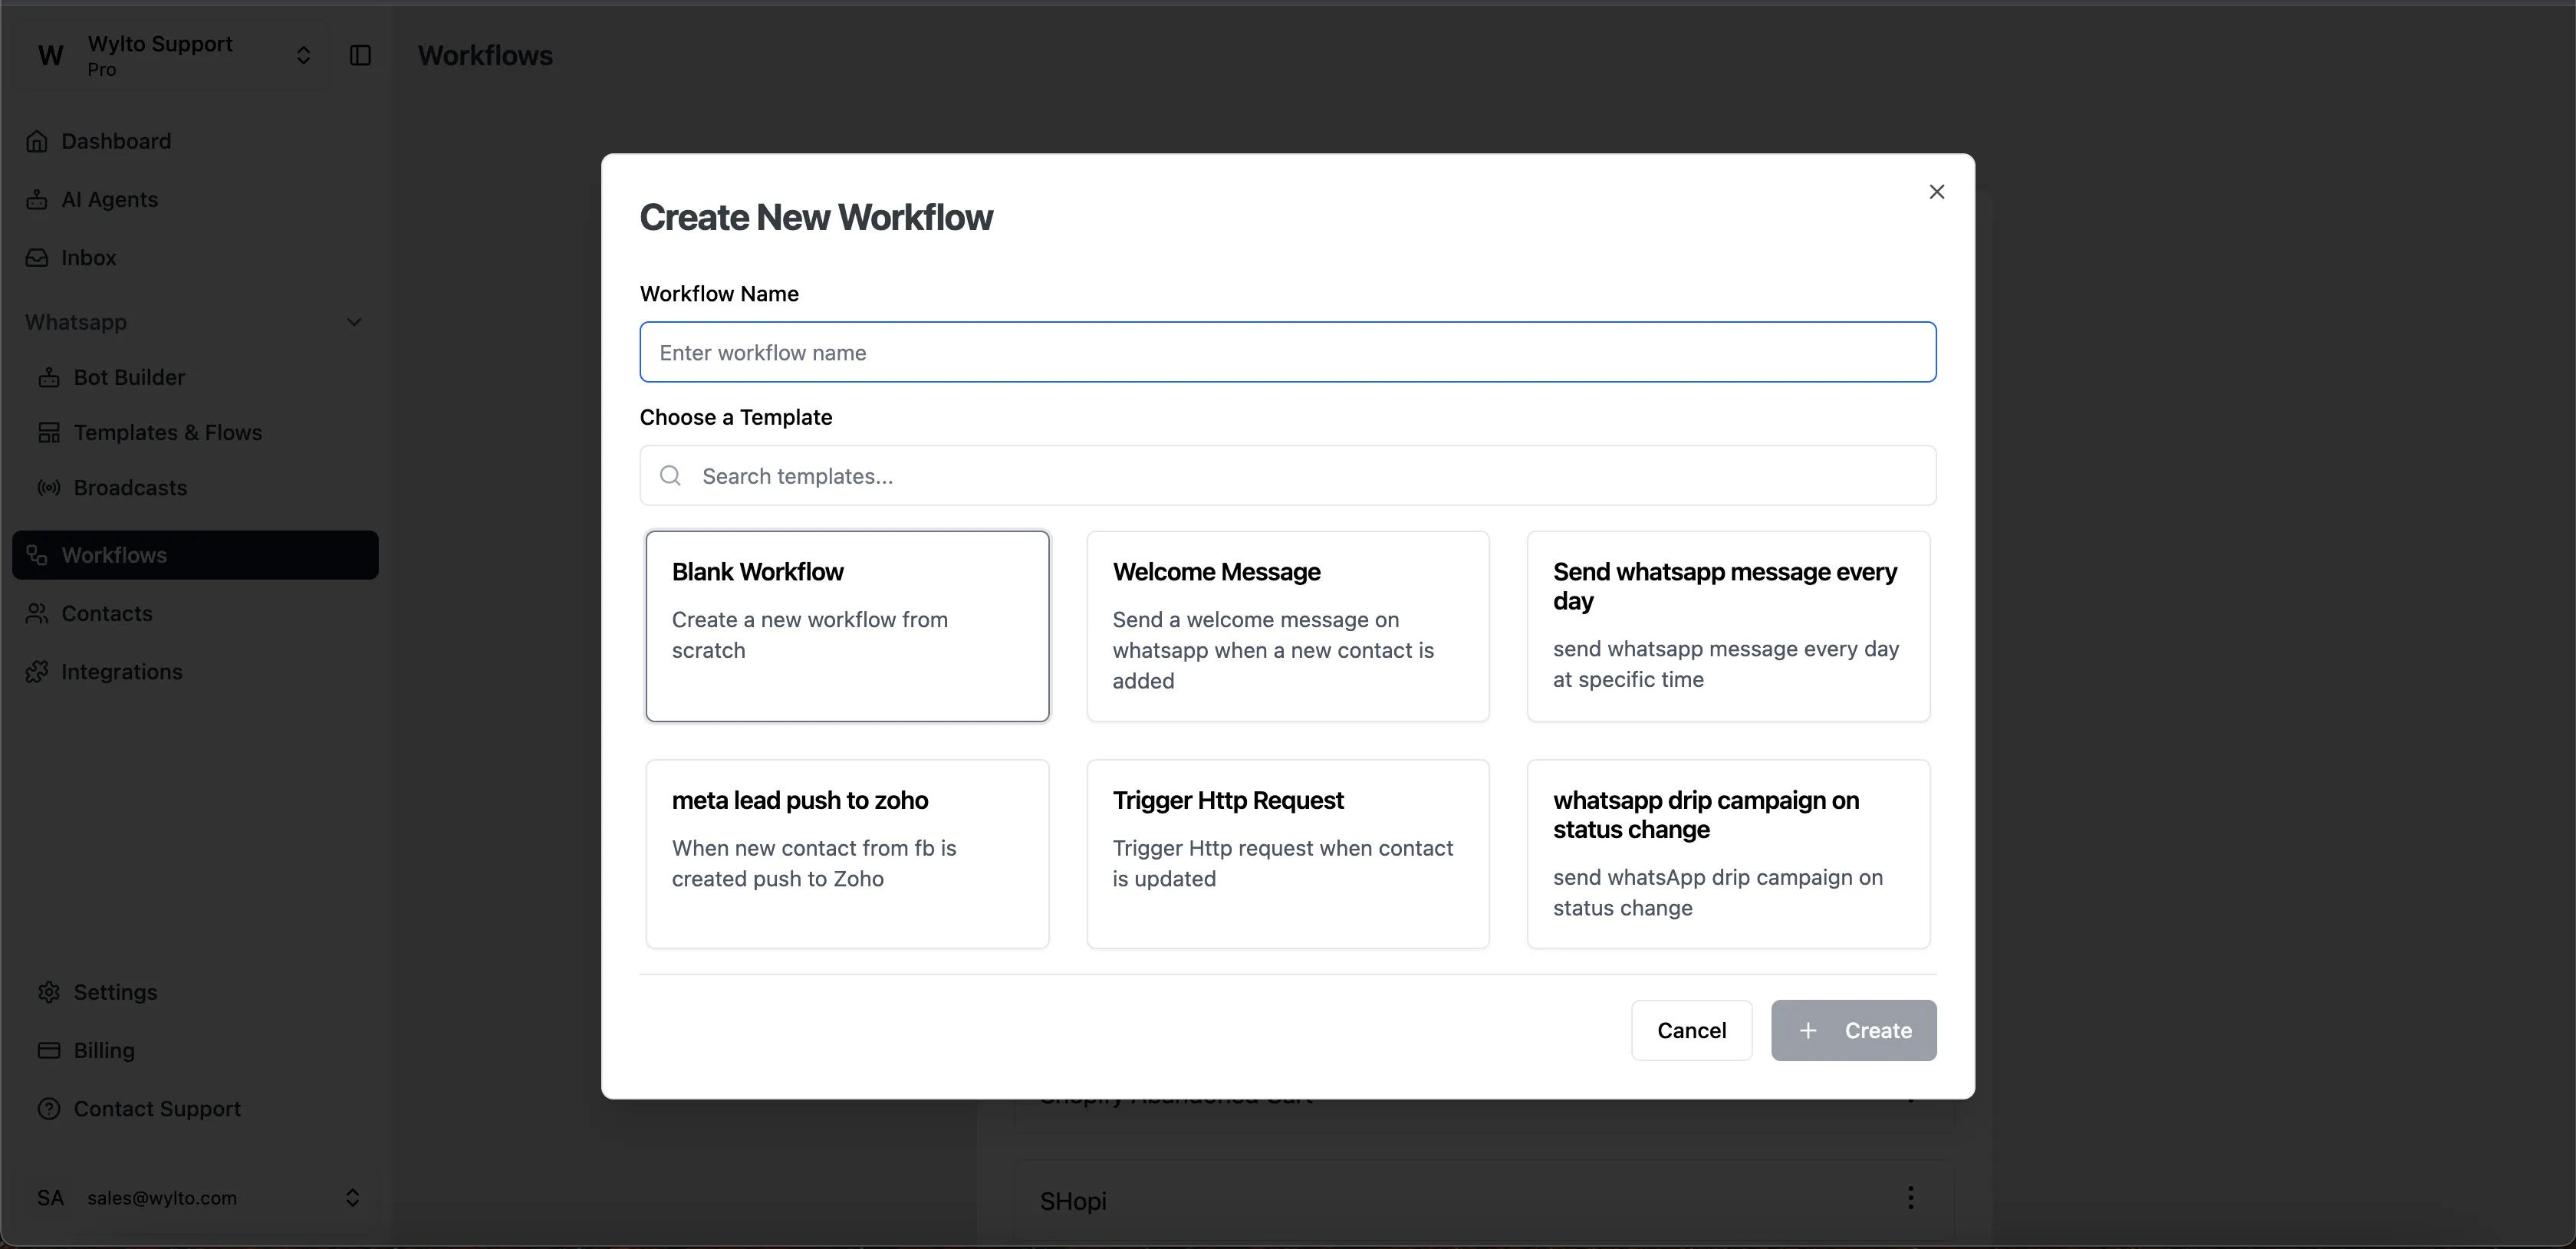
Section titled “2a. Create a new workflow”- In Wylto, open Workflows from the left sidebar and click Create Workflow.
- In the Create New Workflow dialog, enter a Workflow Name (for example,
Order Confirmation). - Under Choose a Template, select Blank Workflow to build from scratch, then click Create.
2b. Add the “Shopify Order Update” trigger
Section titled “2b. Add the “Shopify Order Update” trigger”On the workflow canvas, click Add New Step and choose Shopify Order Update. This becomes the workflow’s trigger. Click the edit (pencil) icon on the step to set which order status should fire it.
Set the status to match the stage you want to message on:
| Order status | Fires when | Common use |
|---|---|---|
created | Order is placed | Order-received confirmation |
paid | Payment captured | Payment confirmation / receipt |
fulfilled | Order shipped with tracking | Shipping + tracking link |
in_transit / out_for_delivery / delivered | Carrier status changes | Delivery updates |
cancelled | Order cancelled | Cancellation / refund notice |
Step 3 — Add the “Send WhatsApp Message” step and connect it
Section titled “Step 3 — Add the “Send WhatsApp Message” step and connect it”Click Add New Step again and choose Send WhatsApp Message.
- Phone Number — set it to the
phoneNumbervariable. - Template — select your approved WhatsApp template (for example,
order_confirmation).
Connect the two steps
Section titled “Connect the two steps”A basic Shopify automation is just two steps: the Shopify Order Update trigger and the Send WhatsApp Message action. When you first add them, they sit one above the other but unconnected — and nothing will run until you link them.
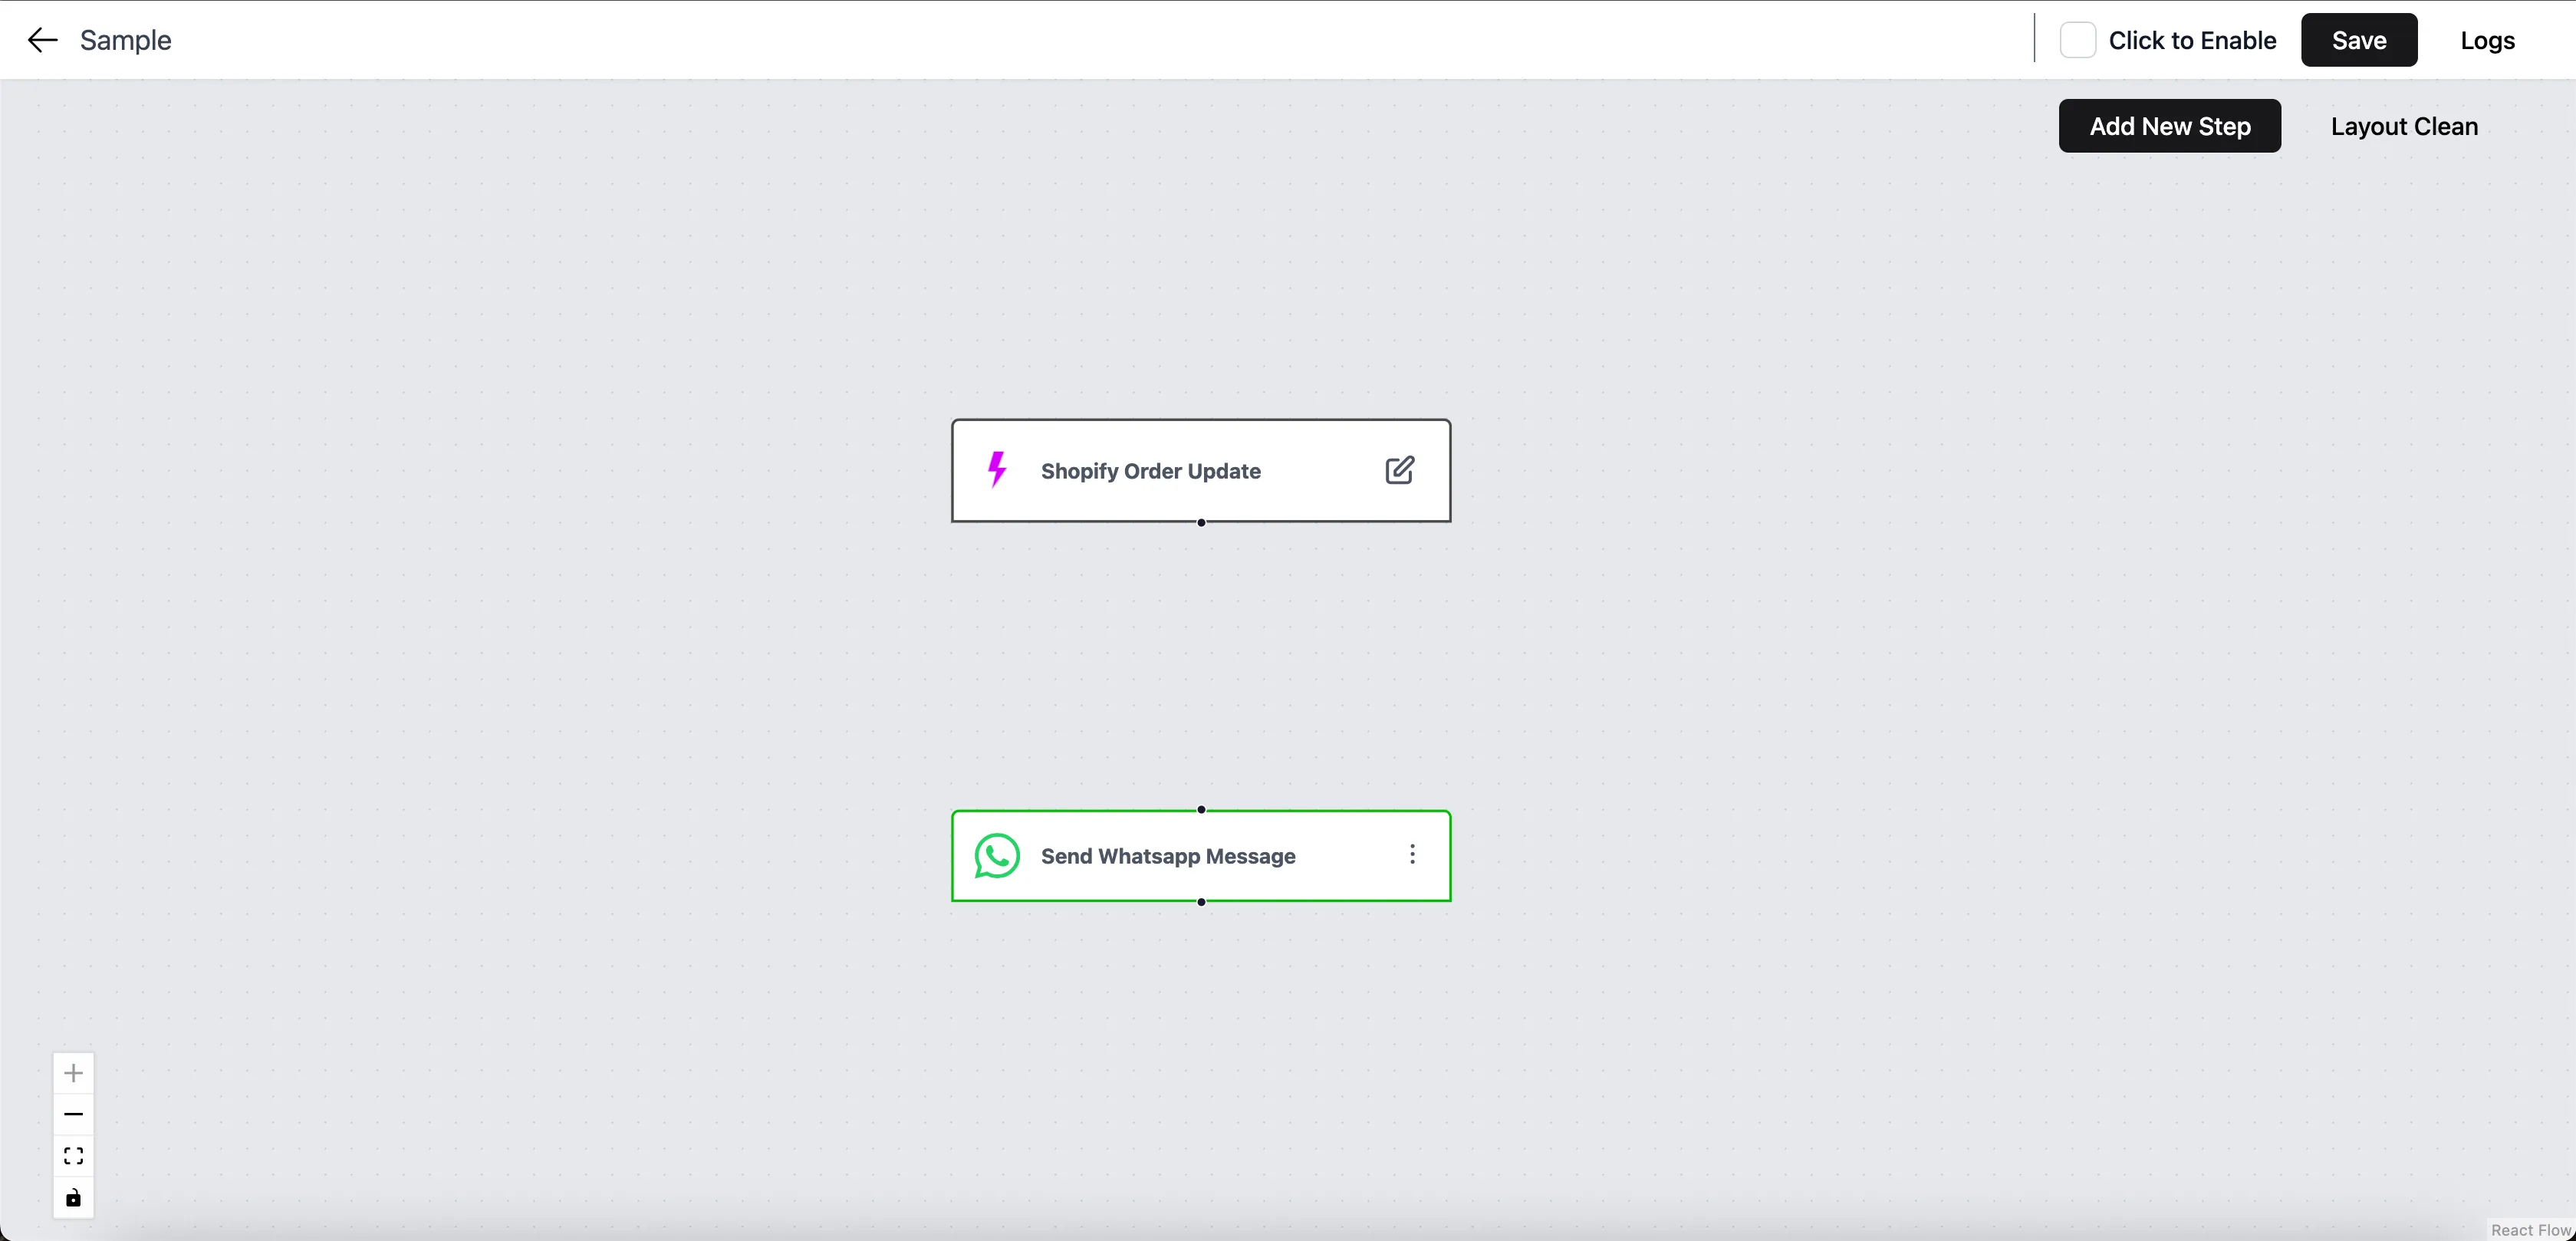
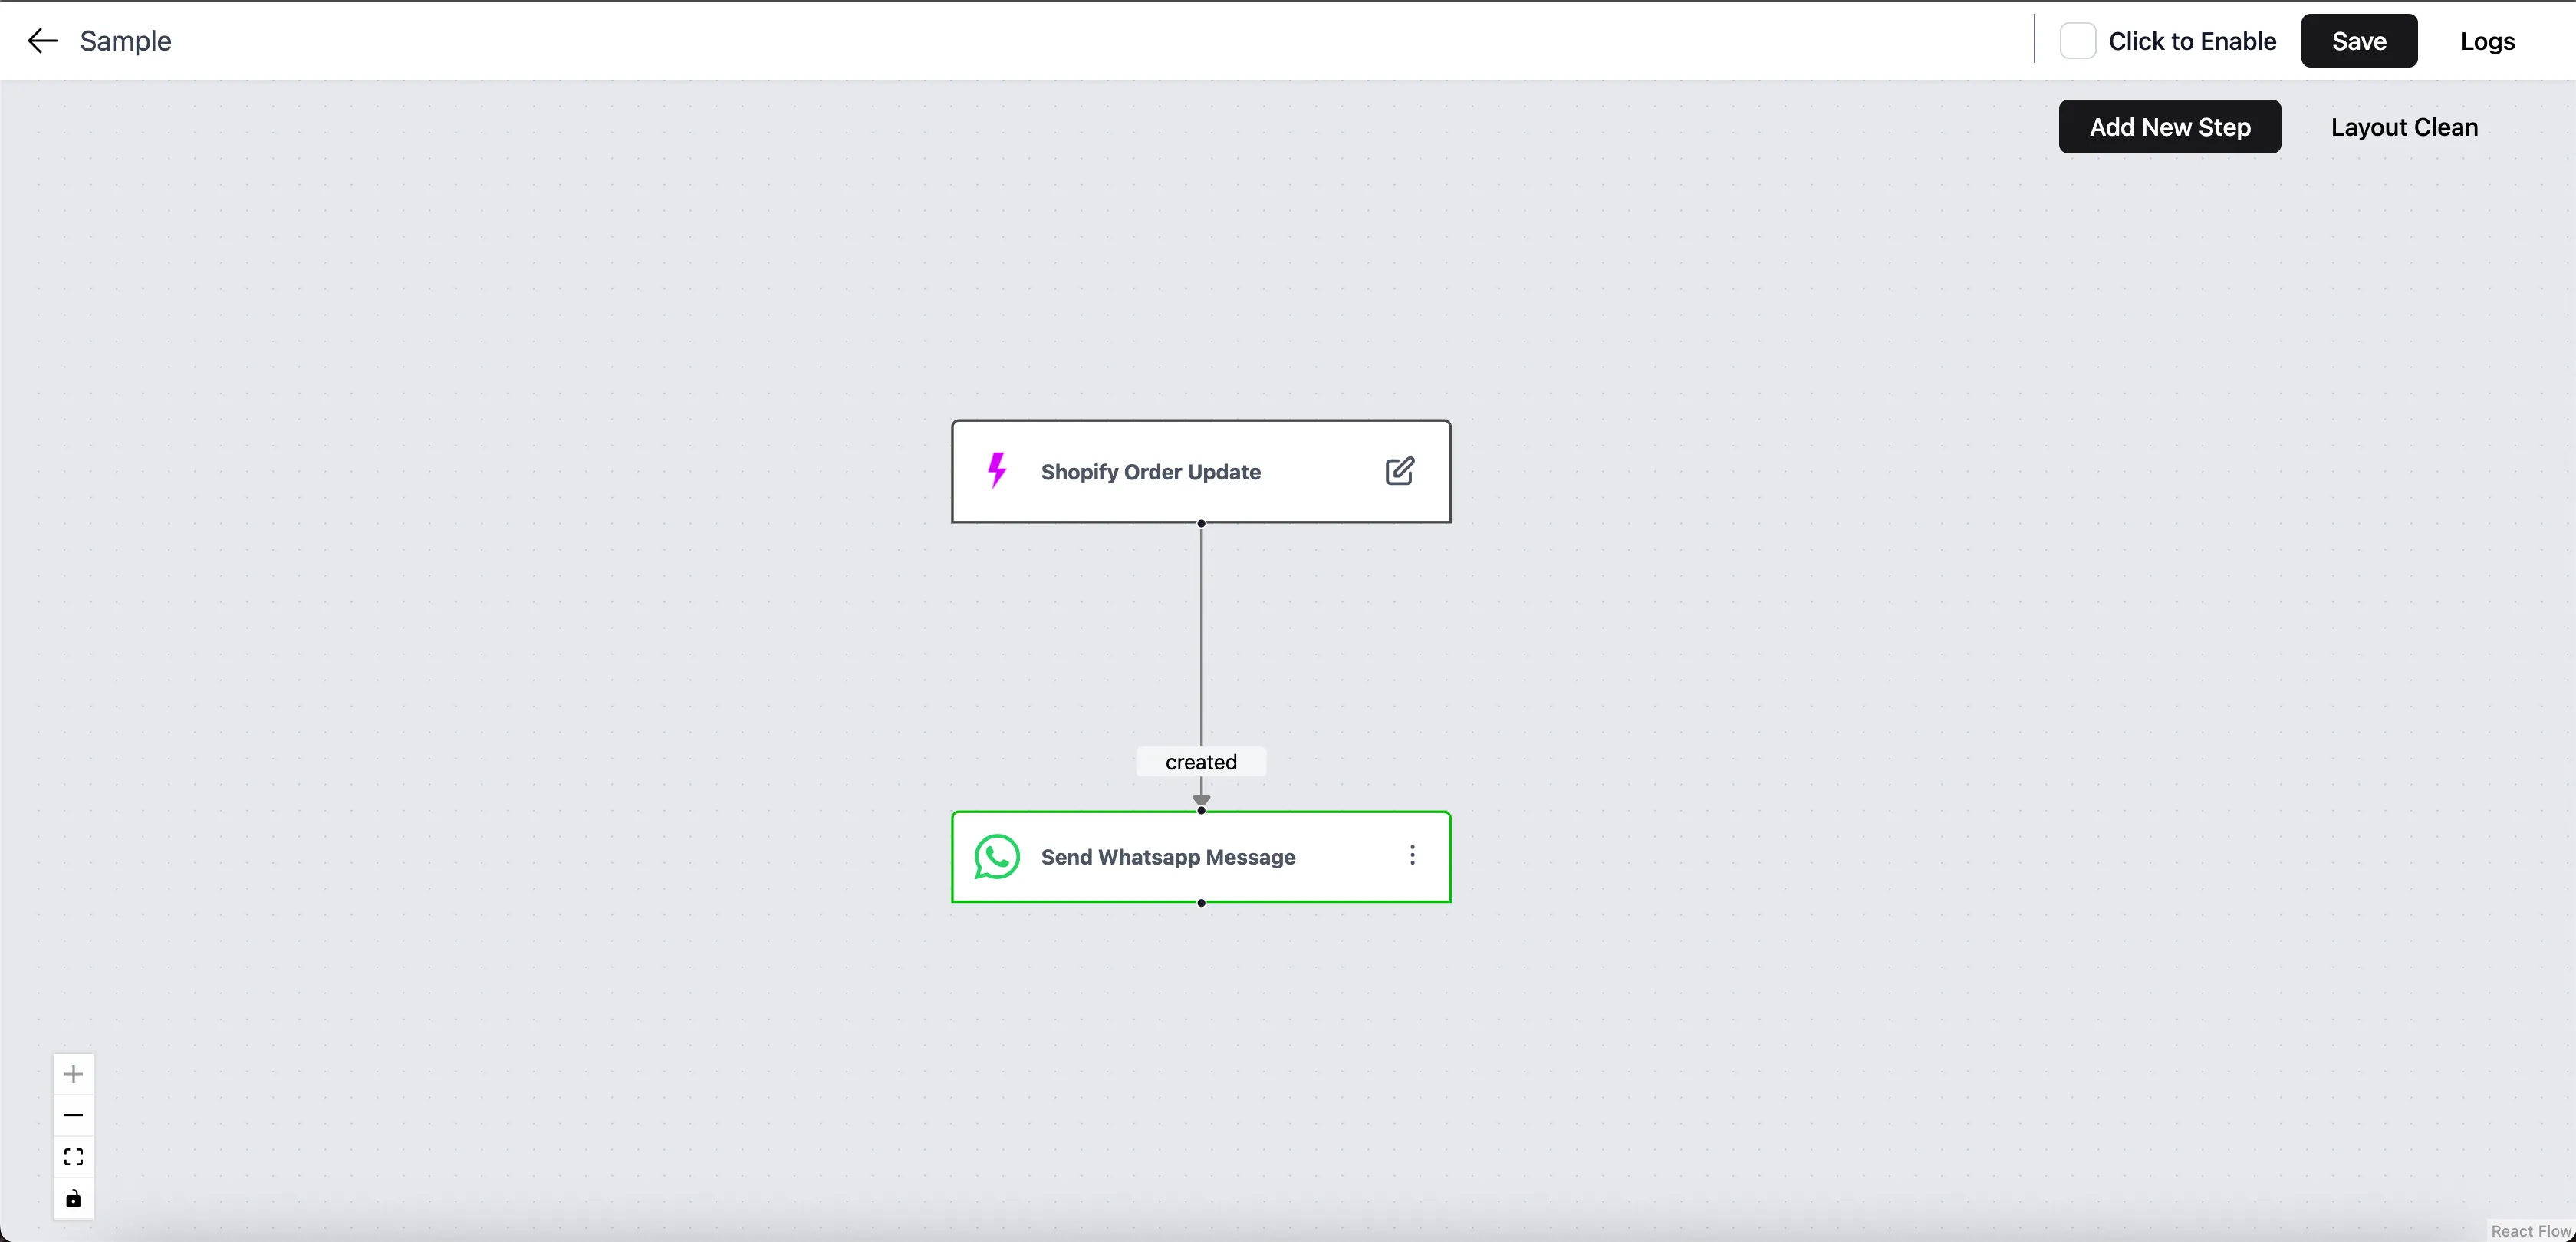
Drag from the connector dot at the bottom of the Shopify Order Update step down to the top of the Send WhatsApp Message step to join them. The line shows the order status (e.g. created) that will flow into the message.
Step 4 — Map the message variables
Section titled “Step 4 — Map the message variables”Your WhatsApp template contains numbered placeholders — {{1}}, {{2}}, and so on. Under Body Parameters, map each placeholder to a Wylto data field. For each {{n}} in the template, click + and select the matching variable.
| Template slot | Map to |
|---|---|
{{1}} | name |
{{2}} | orderId |
{{3}} | your store name |
{{4}} | totalAmount |
Available variables: name, phoneNumber, email, orderId, status, totalAmount, productNames, cartURL, orderStatusUrl, trackingUrl, estimateDeliveryDate, shippingAddress.
Example — the order_confirmation template
Section titled “Example — the order_confirmation template”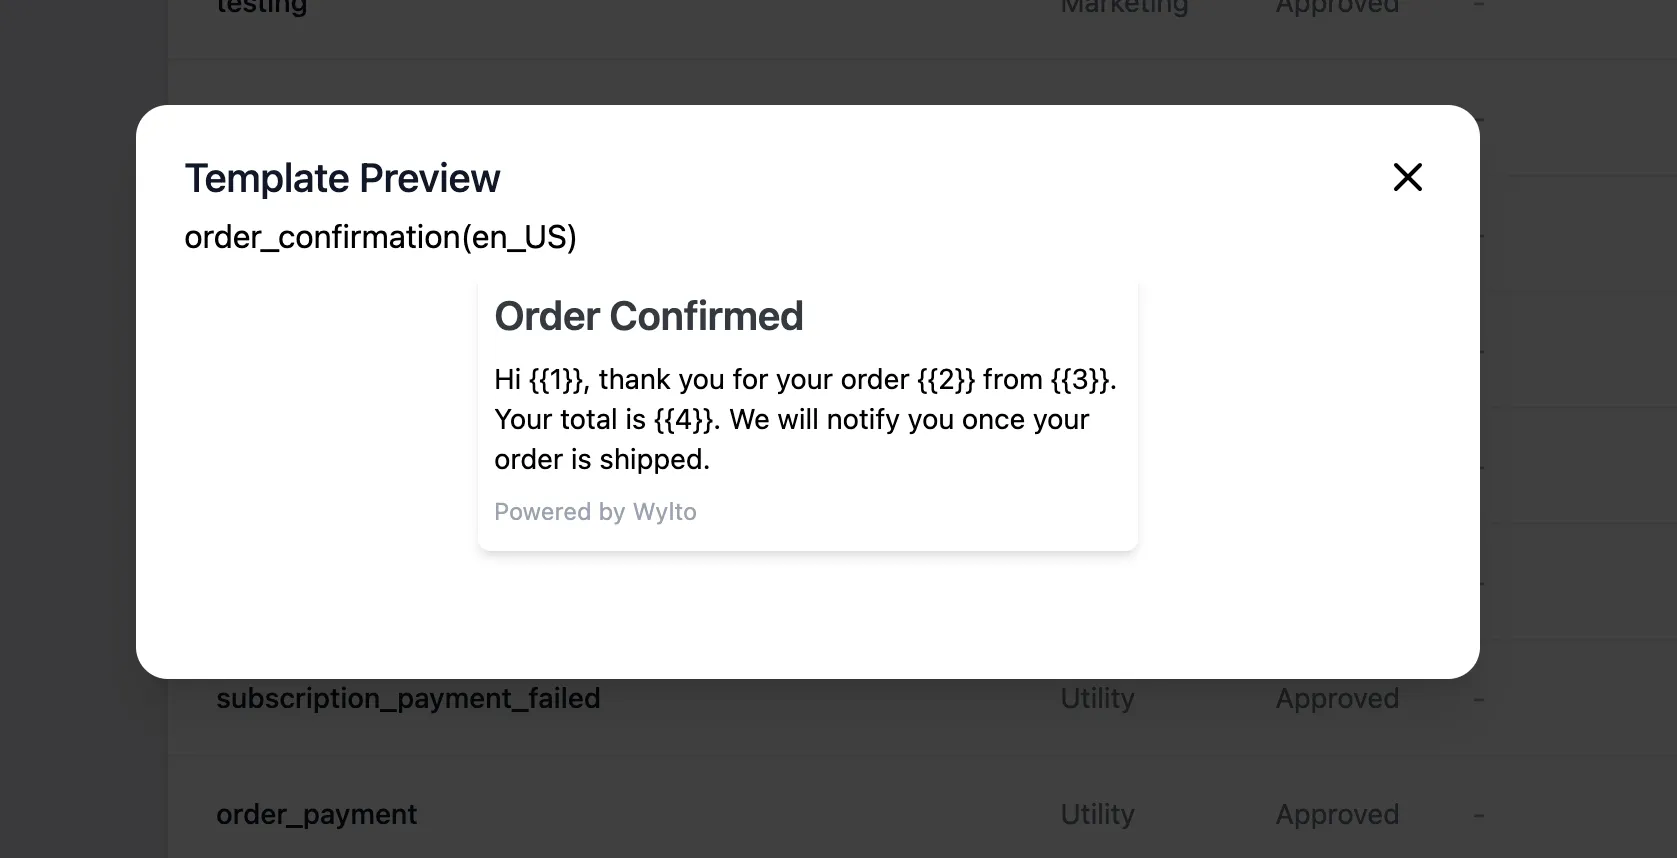
This template’s body reads:
Hi
{{1}}, thank you for your order{{2}}from{{3}}. Your total is{{4}}. We will notify you once your order is shipped.
Map the placeholders like this: {{1}} → name, {{2}} → orderId, {{3}} → your store name, and {{4}} → totalAmount. Wylto fills in the real values for each customer when the message is sent.
Step 5 — Add buttons, delays, and conditions (optional)
Section titled “Step 5 — Add buttons, delays, and conditions (optional)”- Buttons (e.g. Pay Now, Track Order) can carry a dynamic link such as the checkout-recovery URL or order-status URL.
- Add an Add Delay step before a message (e.g. wait 30 minutes before an abandoned-cart reminder).
- Add extra conditions to branch the flow.
Step 6 — Enable and save
Section titled “Step 6 — Enable and save”At the top of the builder, tick Click to Enable to turn the workflow on, then click Save. The next matching Shopify event will send the WhatsApp message automatically.
Step 7 — Test and verify
Section titled “Step 7 — Test and verify”- Trigger the event in Shopify (e.g. create an order and Mark as paid, or fulfil it and click Mark as delivered).
- Open the workflow’s Logs to confirm the run — it shows the trigger, the matched status, and the Send-WhatsApp result (with a message ID on success).
- Check that the message arrived on the customer’s WhatsApp.
Frequently Asked Questions
Section titled “Frequently Asked Questions”Do I need to write any code?
Section titled “Do I need to write any code?”No. Everything is done in the Shopify app (connect) and the Wylto Workflows builder (automate).
What permissions does Wylto need on my store?
Section titled “What permissions does Wylto need on my store?”Read-only access to orders, fulfillments, checkouts, customers, and products. Wylto never modifies your store data.
How do variables work in the message?
Section titled “How do variables work in the message?”Your WhatsApp template uses numbered placeholders ({{1}}, {{2}}). In the workflow’s Body Parameters, you map each placeholder to a Wylto variable (like name or orderId). Wylto fills in the real values when the message is sent.
How do I test a “Delivered” message without a courier?
Section titled “How do I test a “Delivered” message without a courier?”In Shopify admin, open the fulfilled order and click Mark as delivered. This fires the same delivery update Wylto listens for.
Can I add a delay before an abandoned-cart message?
Section titled “Can I add a delay before an abandoned-cart message?”Yes — add an Add Delay step before the Send WhatsApp Message step.
Can I stop a sequence if the customer completes checkout or replies?
Section titled “Can I stop a sequence if the customer completes checkout or replies?”Yes — add stop conditions so recovery messages don’t send after the cart is completed.
Which number do messages send from?
Section titled “Which number do messages send from?”The WhatsApp Business number connected to your Wylto account.
How do I confirm a message was actually sent?
Section titled “How do I confirm a message was actually sent?”Open the workflow’s Logs — each run shows the trigger, the matched status, and the Send-WhatsApp result with a message ID on success.
Can one workflow handle multiple statuses?
Section titled “Can one workflow handle multiple statuses?”Use separate workflows (or condition branches) per status — one for paid, one for delivered, and so on — so each sends the right template.
Related articles
Section titled “Related articles”- Integrations — connect the Wylto app to your Shopify store
- Templates & Flows — create and approve WhatsApp message templates
- Workflows — build multi-step workflows with delays & conditions